|
PumaPay’s Recurring Cryptobilling Solution Now Available in NATS
Too Much Media is excited to announce that the chargeback-free and close to zero costs PumaPay PullPayment Protocol, is now integrated as a billing solution in the NATS platform.
PumaPay is the first company to offer a blockchain-based recurring payments solution. Its PullPayment Protocol is based upon a unique, smart contract architecture. This means that Customers can authorize Merchants to withdraw or ‘pull’ funds from their account, based on pre-approved terms. This pull mechanism is the defining feature of the PullPayment Protocol.
The PumaPay solution allows Merchants to set up their typical billing models in the Business Console. This allows Customers to pay in PMA via the PumaPay wallet for everyday items in ways they are already familiar with. It’s a simple, seamless process for Merchants and Customers.
Benefits of Using PumaPay
Low Fees and No Chargebacks
Immediate Settlement
No Middleman
Multi-Billion Dollar Market
Get Started in 3 Easy Steps
Step 1: Register with the PumaPay Business Console and submit a support ticket with NATS
Step 2: Create your Advanced Billing Models using our intuitive easy-to-use 4 step wizard
Step 3: Add PumaPay as you normally would as a Biller in NATS
Grow your businesses with PumaPay’s monetization technology and start accepting cryptopayments today!
If you’d like to discuss in more detail or schedule a product walkthrough please contact George Orphanides, Head of Integrations: george@pumapay.io
For more information about PumaPay, visit PumaPay.io or to register visit the Business Console
|
In today's business climate, capturing and analyzing data has become more relevant to keep a competitive edge and continue financial growth. An area of focus in the new NATS 5 admin interface is the ability of it’s administrators to create and customize reports based on actionable data you see useful in the management of operations, providing efficiency along the way.
In order to understand how the creation of reports is accomplished, one must first understand some newly introduced terminology to the platform and for the overview below.
Definitions:
Data Point: one element of data in a collective group (Example: When reviewing a group of data such as joins, raw hits, total income… each individual element is considered a “data point”)
Actionable data: Collected information that provides insight for action to be taken.
(Example: By collecting conversion data and filtering by date in a report, one can see when sales may have decreased in a specific time period and analyze further to determine if there is a way to increase the conversions during these times. The data collected is actionable)
Focus: Data points grouped together in a data set. (Example: In Report X, we see “raw hits”, “impressions”, “unique hits” and “joins” data fields… the combined data points selected for Report X form a focus)
Filtering: A way to choose a smaller subset of your accumulated data, also known as segmenting (Example: Instead of a full months worth of conversions, you can filter the data by choosing a specific timeframe)
Below is an overview of how to create a custom report. Changing any focus or filter within a report makes it custom, allowing it to be saved and stored for future access. While the data will be different for everyone, the process remains the same.
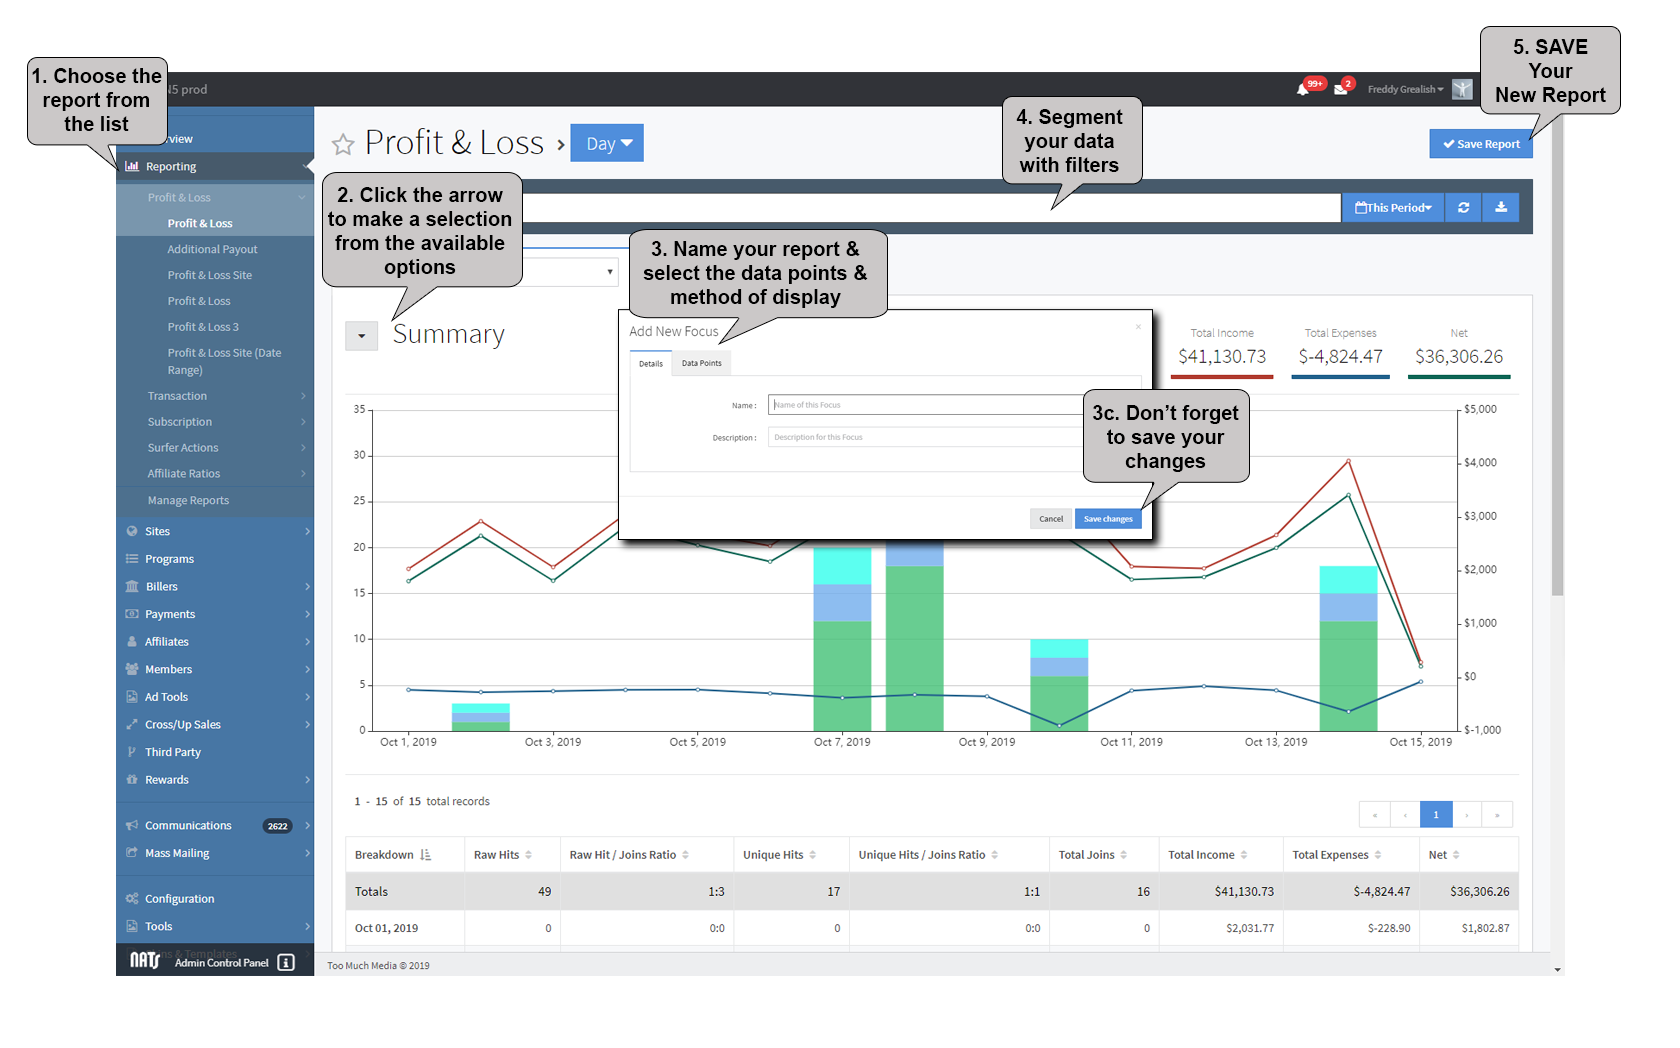
1. In your NATS 5 Admin, select the type of report from the pre-formatted options in the list (under the Reporting section in the left navigation)
2. Click the drop-down arrow next to "Summary" section and make a selection. Let’s review your options and help you understand what each accomplishes.
a. Add New Focus - Create a new focus based on data points you select from the available choices.
b. Edit Current Focus - Allows you to edit the currently displayed focus on an existing report. (note: you cannot edit a default focus. Instead, a new focus will be created after you click the “save changes” button in the pop-up window).
c. Duplicate Current Focus - create a duplicate of the currently displayed focus in the report you are viewing
3. A popup window will display after making your selection from step #2 above.
a. Under the "Details" tab, you will provide a unique name and description for this focus
b. Next, select the "Data Points" tab. Here you will add available data points you want to use to create your focus. While selecting data points, you have the ability to select how you want each to be displayed on your report, meaning it can be displayed in "table" format, "graph" format or both. The choice is yours.
c. Once you are satisfied all data points are added and you choose display options, click the "Save Changes" button in the pop-up window. You have now created a new focus (which can be used on additional reports, when selected).
4. Now that you have your focus created, you can further segment the data via filters. By placing your cursor in the toolbar provided at the top of the page, filtering options will present themselves to further segment your data.
Now, let's talk about filters, or segmenting. When segmenting your data, remember your objective is to make analysis more efficient, not complicated. Filters in NATS 5 can consist of metrics such as geo-location, website, tour, campaign, biller or what you deem necessary to refine the current data in your report. When filters are applied, and a report has been saved, opening the report at a later time maintains those filters. This allows you to quickly revisit the report or create new reports by making minor adjustments to the pre-set filters you established, without the need to start from scratch and populate a blank template.
Example: Let's say you want to create a separate P&L report with the same focus, per unique website in your program. Simply open a pre-formatted P&L report, add a filter for the site you wish to display data for, click the “save report” button in the top right, review any changes, re-name with something identifiable to the specific report (Example: P&L domain 1, P&L domain 2… each must be unique), save as a new report, and have a unique report for each website for quicker reference.
5. Once you have all the steps above completed to your preference, don't forget to SAVE your report for quick access as needed. When saving this as a new report, a pop-up window will display so you can review or modify and of the rules established during creation, such as report name, focus, sort order, period, and breakdown. |